Table of Contents
7. General usage
This section covers the basic workings of SMART Mobile outside of the packages which are installed. This includes how to Connect to a package, manage it and configure settings.
7.1. Connect tab
After a package has been created in SMART Desktop, it must be installed by SMART Mobile. There are three ways to get a package to a device: USB cable, the internet or NFC (like Bluetooth).
7.1.1. USB cable
SMART Mobile should already be installed (see section 3) on the device. Check out the section on installing SMART Mobile first.
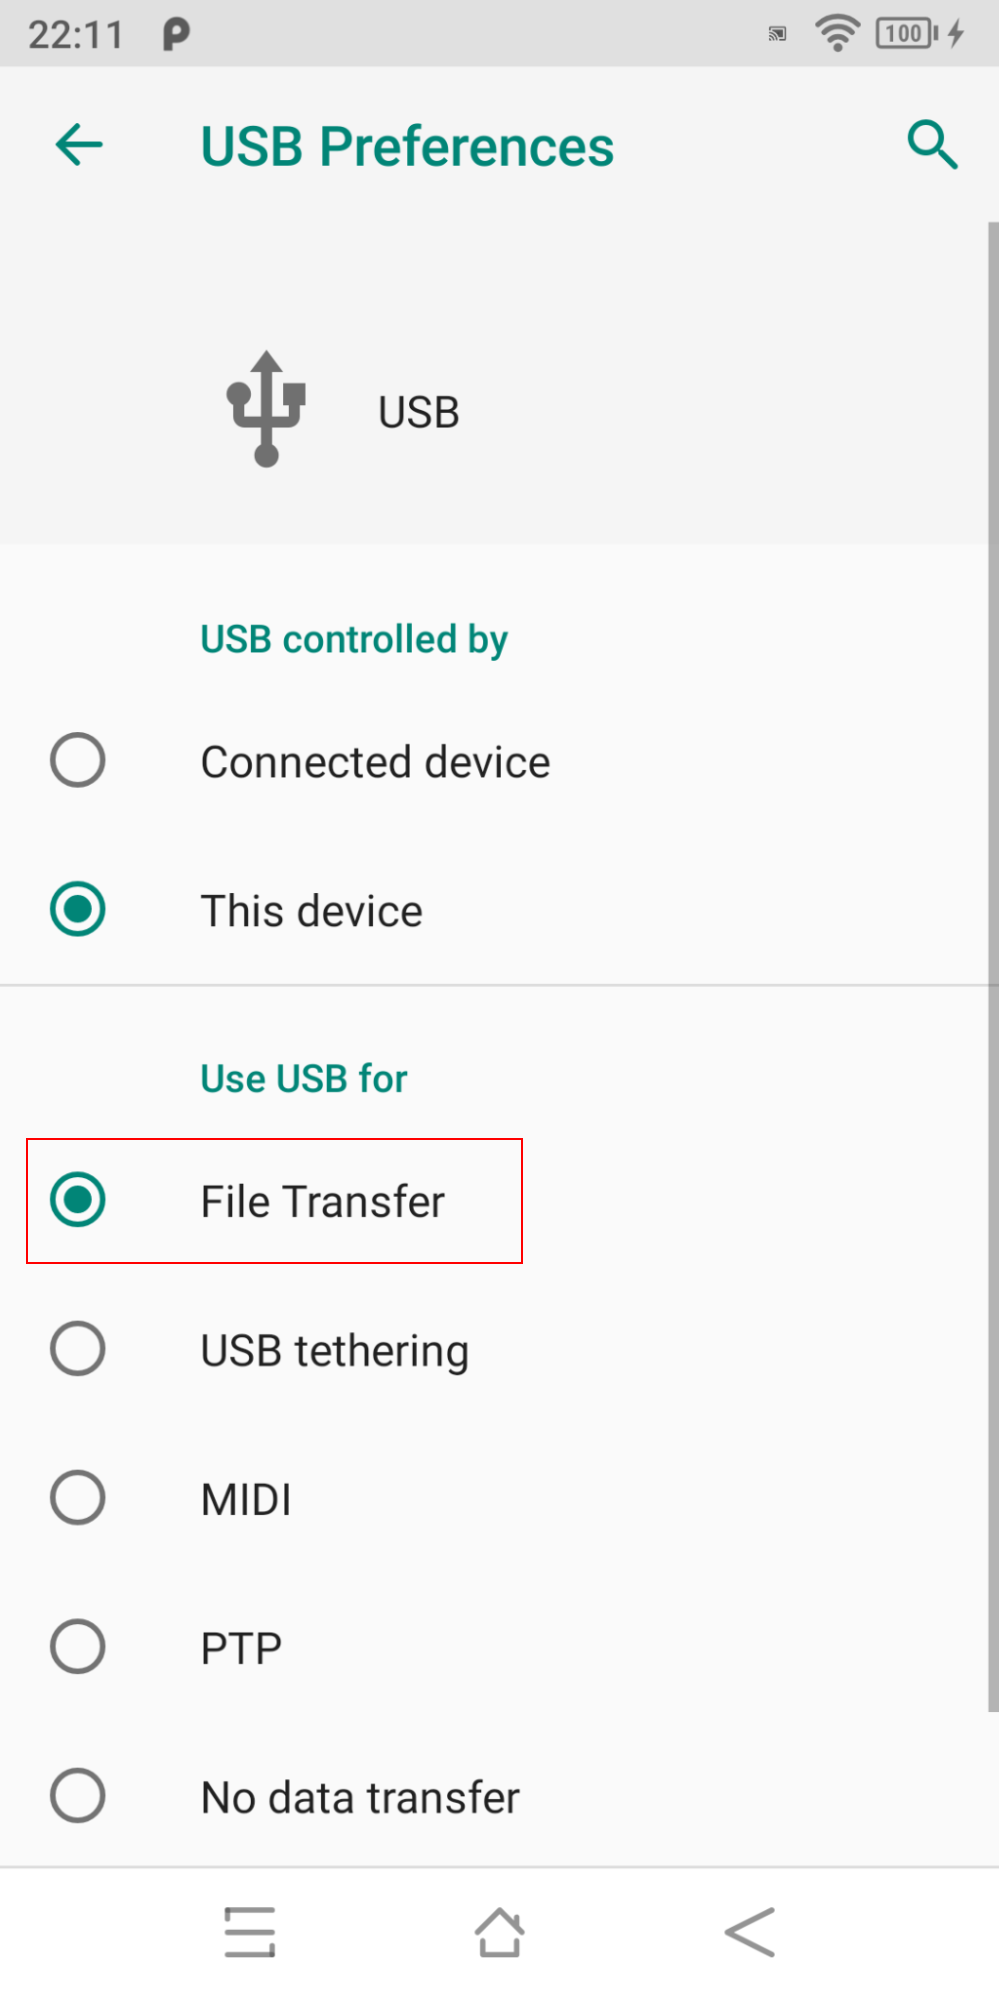
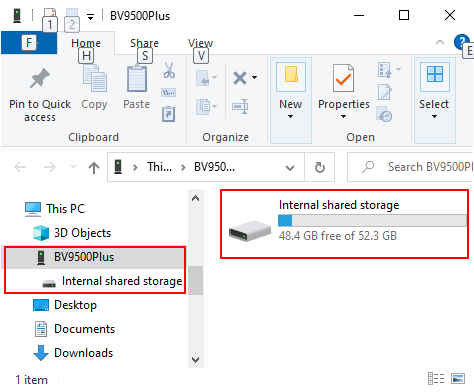
Connect the device to the PC using a USB cable. Make sure the device is configured to Transfer files and shows up in Windows Explorer as a device. If this does not happen, consult the troubleshooting section.
 |
 |
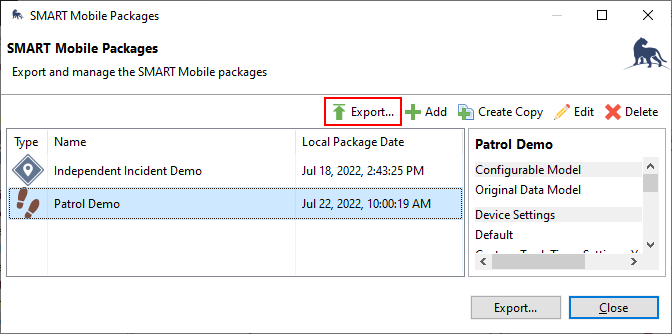
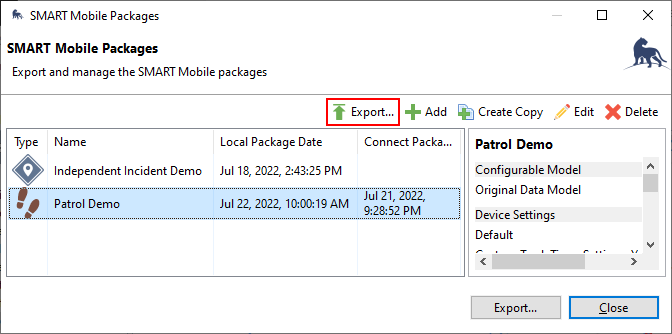
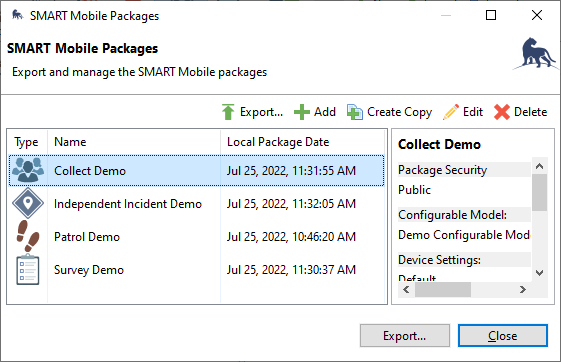
Now open the SMART Mobile Packages dialog from the Field Data menu and click the Export button:
 |
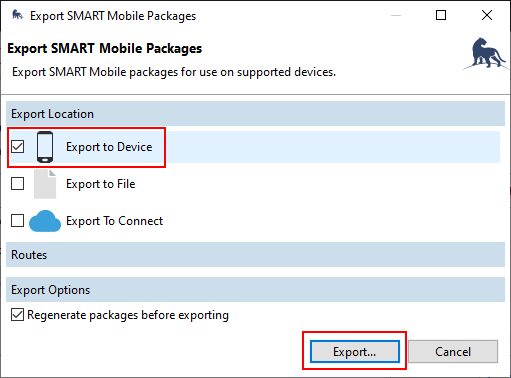
The Export SMART Mobile Packages dialog will display. Check Export to Device and then click the Export button:
 |
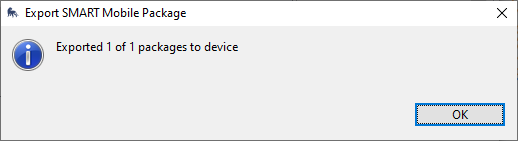
When the process succeeds, the following message will display:
 |
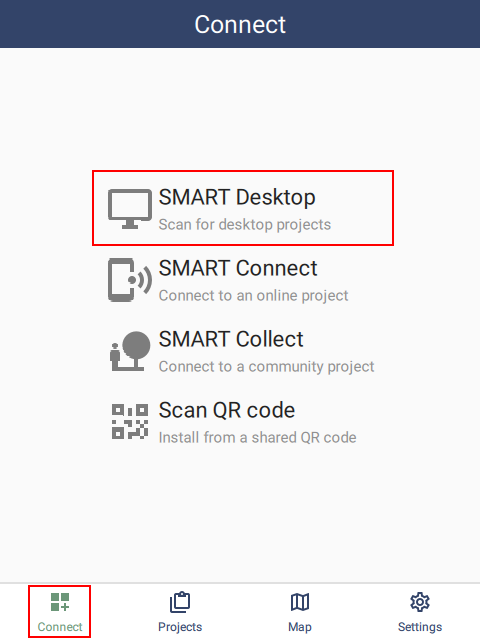
Now launch SMART Mobile on the device and go to the Connect tab and tap SMART Desktop - Scan for desktop projects:
 |
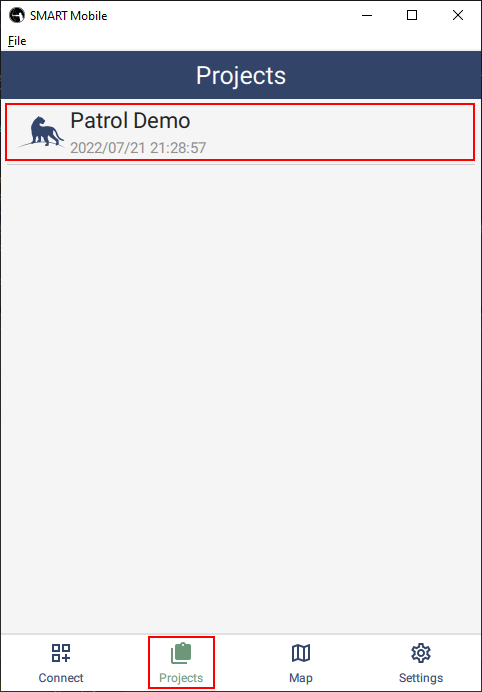
After a few seconds, the package will be found and installed as a project. SMART Mobile will automatically navigate to the Projects tab:
 |
7.1.2. Connect
SMART Mobile should already be on the device. Check out section 3 on installing SMART Mobile first.
7.1.2.1. Uploading a package
Open the SMART Mobile Packages dialog from the Field Data menu and click the Export button:
 |
The Export SMART Mobile Packages dialog will display. Check Export to Connect and then click the Export button:
 |
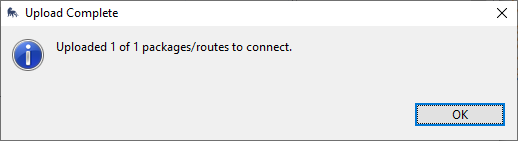
When the process succeeds, the following message will display:
 |
7.1.2.2. Installing from a server
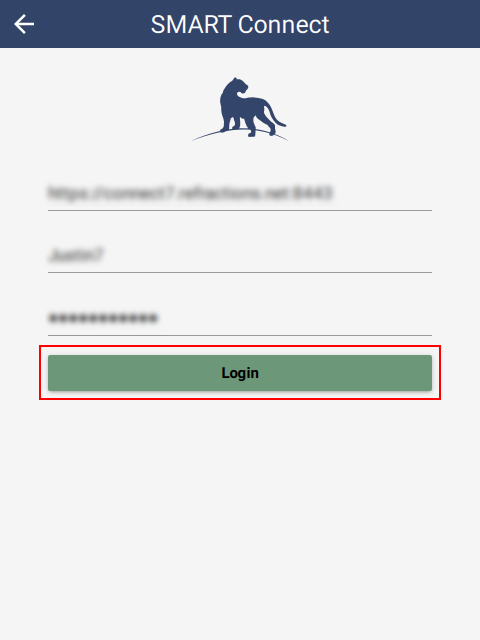
Now launch SMART Mobile on the device and go to the Connect tab and tap SMART Connect - Connect to an online project. Select the server, username and password and tap Login. Then select the package to install.
 |  | 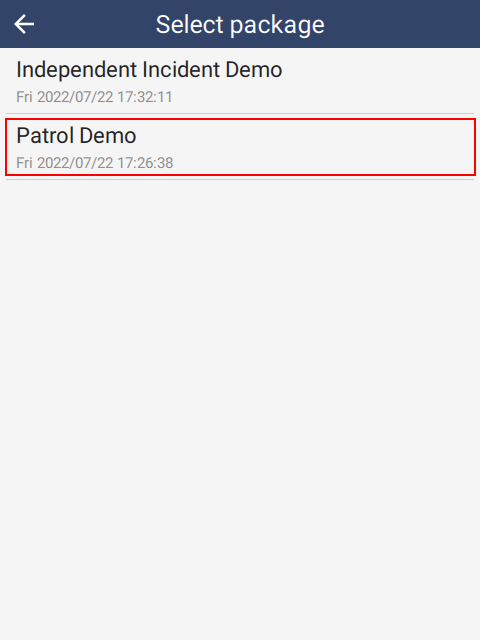 |
After downloading the package, Patrol Demo will be installed. The Projects tab will automatically be selected:
|
7.1.2.3. Installing from a Package URL
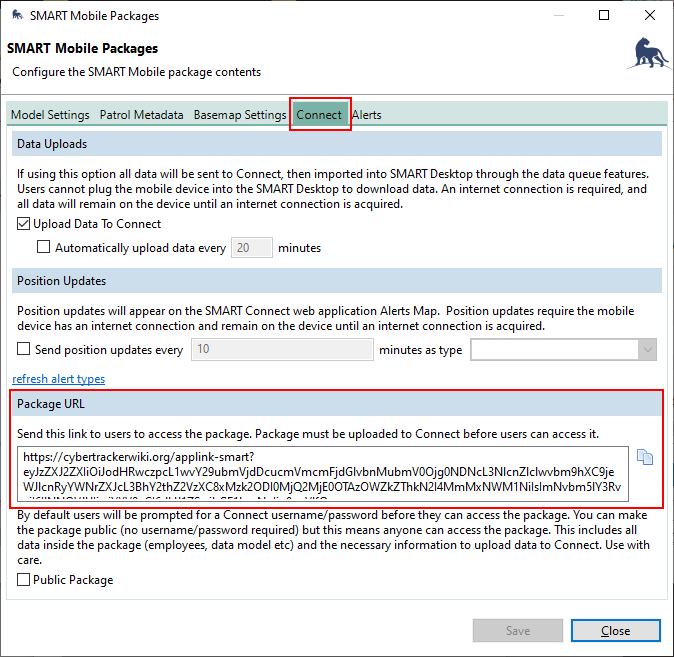
Once a package has been uploaded to Connect, it can be installed on a device using a Package URL. This URL is sent to a device using WhatsApp, SMS, Email or another system. The user taps on the link and SMART Mobile will be launched and install the package.
Click the button to the right of the Package URL to copy the link to the clipboard. Then paste it into an email and send it to users. Tapping on the link on a phone with SMART Mobile installed will trigger the install.
 |
If SMART Mobile is not installed on the device when the user taps the link, the browser will navigate to the following web page. The button for App Store will appear on iOS devices and and the button for Google Play will only appear on Android devices. Tapping the button will open the store to the link for download.
 |
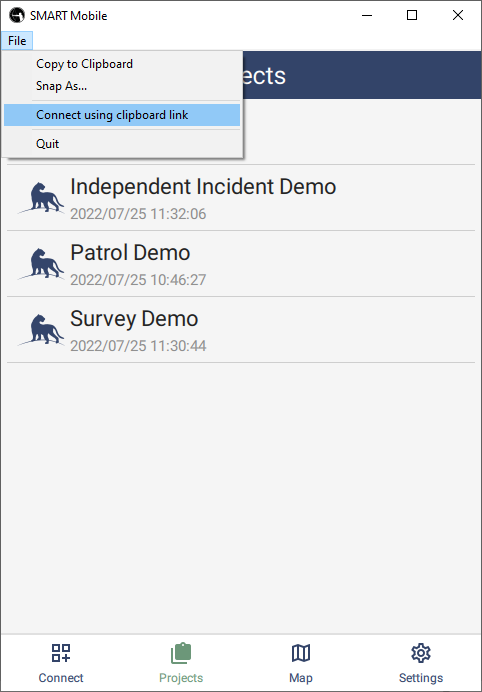
The Package URL can be used directly on the SMART Mobile Desktop Simulator. First copy the Package URL to the clipboard, then click the Connect using clipboard link menu option.
 |
7.1.2.4. Installing with a QR code
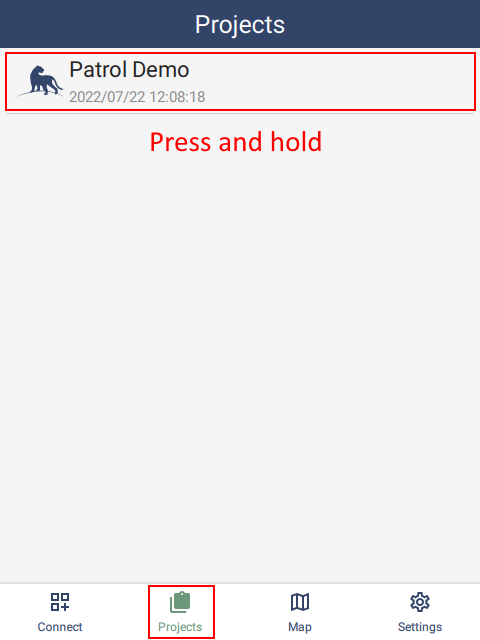
SMART Mobile can generate a QR code for an online (Connect or Collect) package. When the code is scanned, SMART Mobile will launch and then download and install the package. To generate a QR code for a package, long press on the project until a project options page shows up.
 |  | 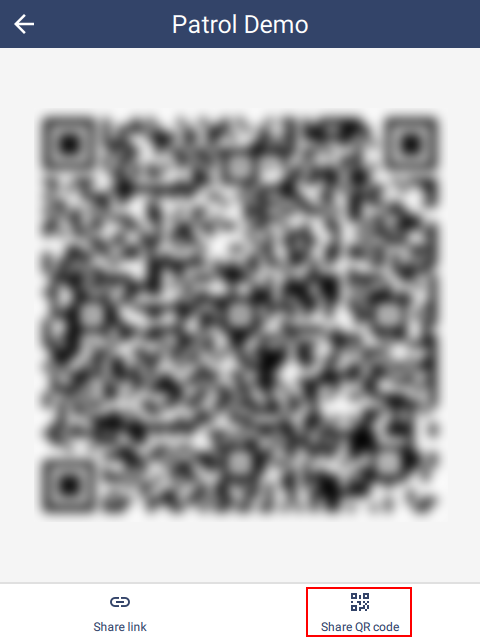 |
The QR code can be scanned by other devices directly from this screen. Alternatively, it can be shared over email for others to use. For example, it could be added to a document or poster for others to connect to directly.
For Connect packages, scanning the QR code will cause SMART Mobile to prompt with a username and password page. Enter credentials to download and install the package.
For public packages without security, the package will be downloaded and installed directly.
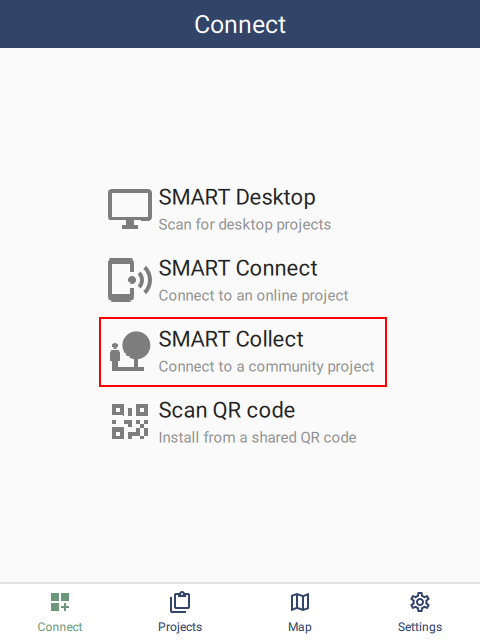
7.1.3. Collect
A Collect package is a package type suitable for distribution to the general public. The user interface is simplified and data must be uploaded to a Connect server.
Collect packages are created on the SMART Mobile Packages dialog:
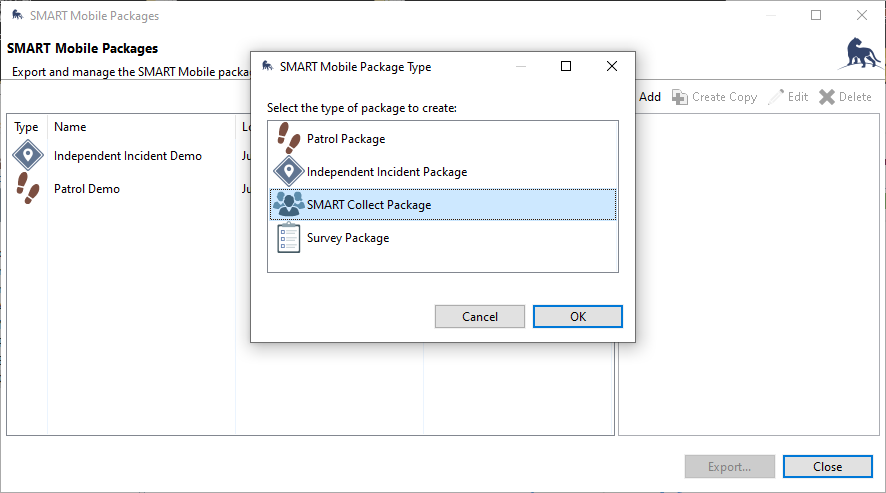 |
They are published to the server in the same way as any other package.
Collect packages can be discovered by publishing them to a central register. For example:
 | 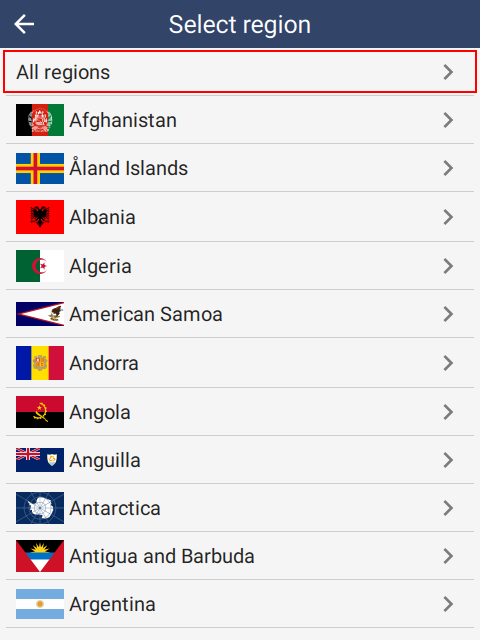 |  |
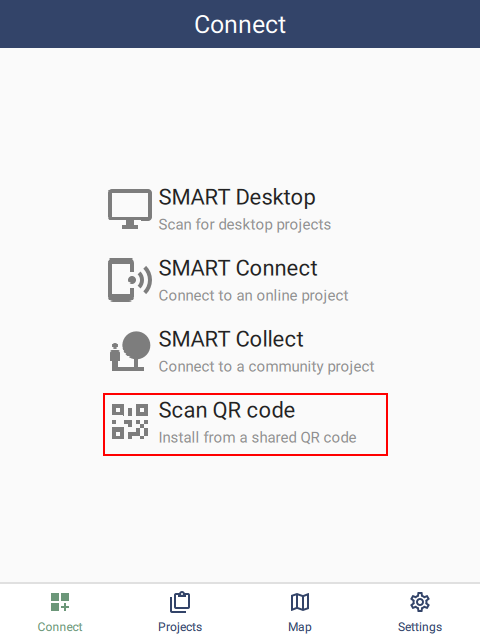
7.1.4. Scan QR code
Scan QR code opens a camera window which scans for a QR code. The QR code contains a Package URL (see above). If a QR code is found, the associated SMART Mobile package will be downloaded and installed in the same way as if the user clicked a Package URL link.
If the device has its own QR code scanner, SMART Mobile will be automatically launched and the package will be downloaded and installed.
 |
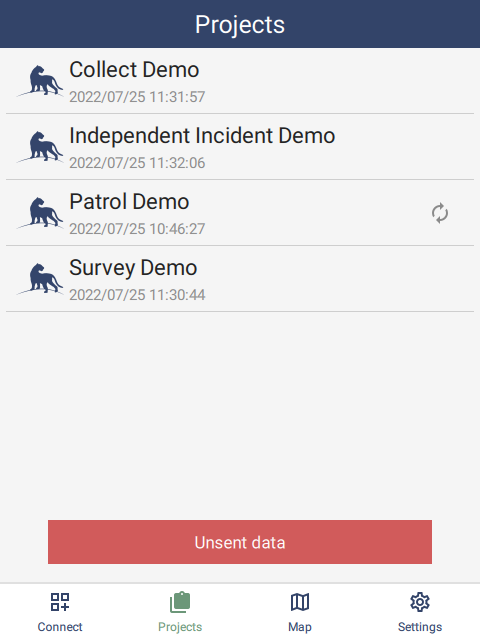
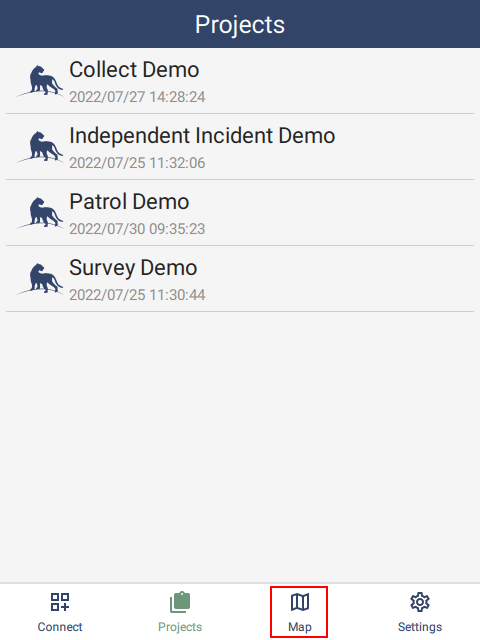
7.2. Projects tab
SMART packages are listed on the SMART Mobile Packages dialog:
 |
They are installed on SMART Mobile using one of the package installation mechanisms (see section 7.1). Long press (or press and hold) on a Project shows the Project details page.
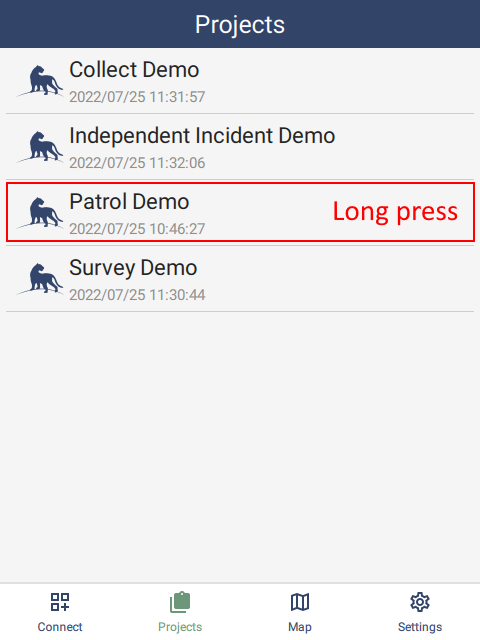 | 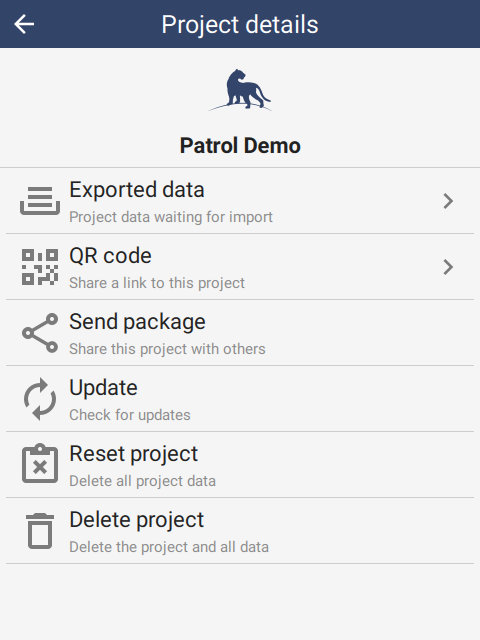 |
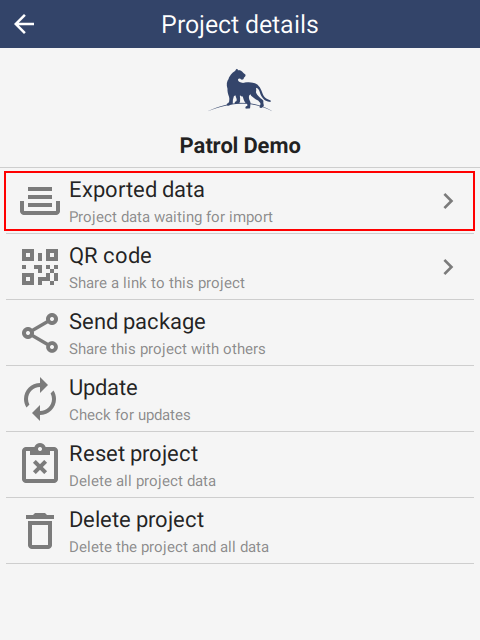
7.2.1. Exported data
Exported data are data files on the device that are awaiting import from SMART Desktop. The data in them cannot be edited or modified.
Data is typically exported after a patrol or survey by tapping the Export data button. If a new Patrol/Survey is started and the previous Patrol/Survey has not been exported, an export will be triggered automatically.
Data can be shared using the device sharing system (e.g. email). This is designed as a recovery mechanism in case the device cannot be connected to a PC.
 | 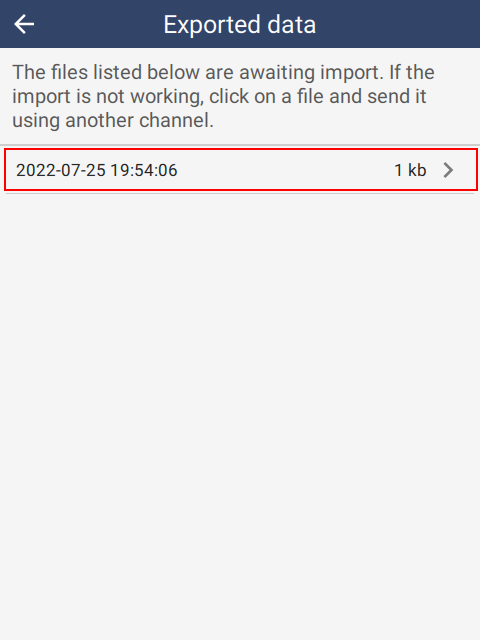 | 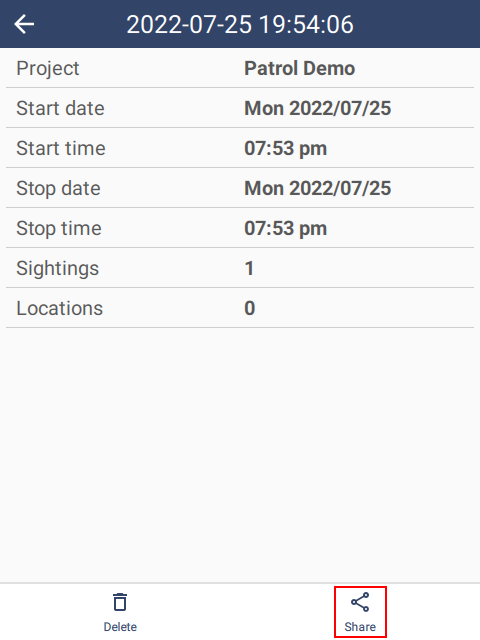 |
For the Connect configuration, data will be sent directly to the server and will never appear in Exported data.
For the USB cable configuration, a data file will be created when tapping Export data or starting a new Patrol/Survey when the previous one has not been exported.
Exported data is also visible from the Settings page inside the project (see section 8.6.5).
7.2.2. QR Code
QR Code is a method to share Projects with other users. See section 7.1.4.
7.2.3. Send package
Send package is a method to send a Project to another user using the device sharing system. See the section on Package Installation.
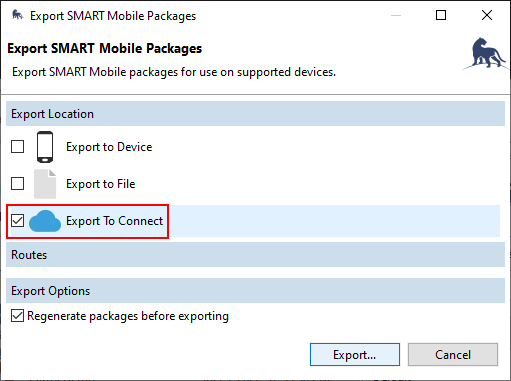
7.2.4. Update
Packages served from Connect may be updated on the server. Clicking Update here will test to see if a newer version of the package is available for download. If so, it will download and install it.
Packages are updated on Connect using the Export to Connect feature on the Export SMART Mobile Packages dialog.
 |
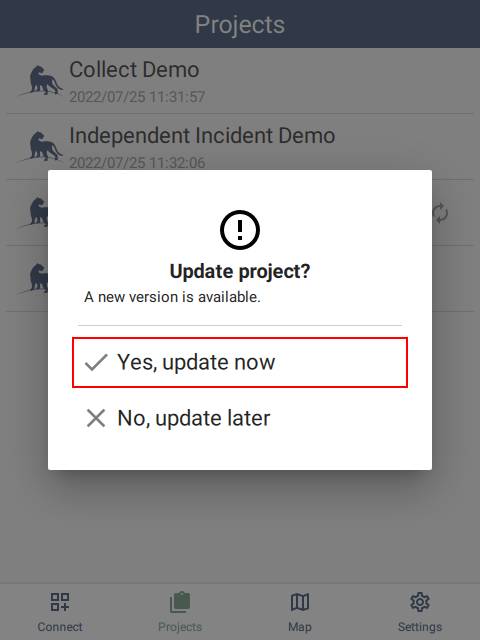
When a newer version of a package is detected, SMART Mobile will prompt the user that it is available for download. Tap either the button to the right of the project row to update. When launching, a prompt will appear if an update is available. To confirm, tap and hold Yes, update now. It is recommended to update as soon as an update is available, however failing to do so will not cause data loss.
 |  |
Before updating, all data must be exported. If it is not, then the Unsent data message will appear. To fix this, launch the project and tap Export data. Export data requires that a patrol is not running.
 |
7.2.5. Reset data
Reset data is a troubleshooting feature which resets a project to its initial state. All project data is removed and reset.
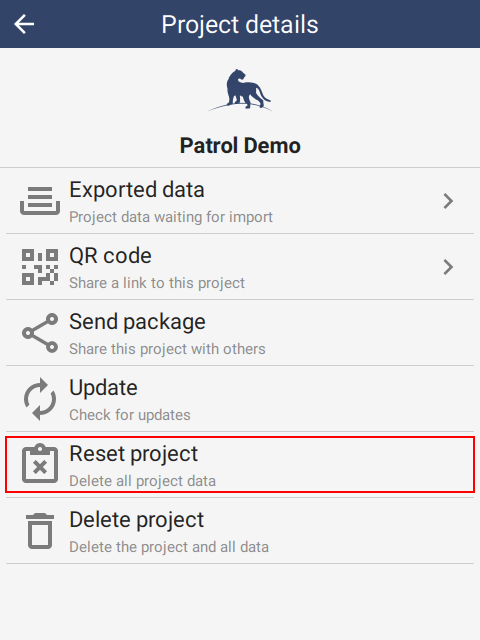 | 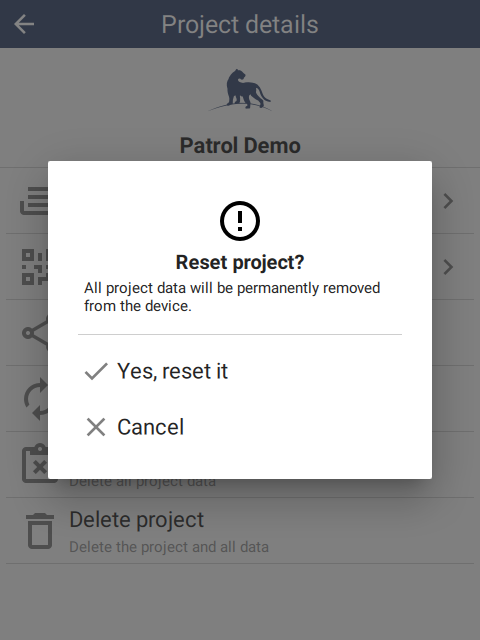 |
7.2.6. Delete project
Delete project permanently removes a project from a device. All project data is removed.
 |  |
Swiping left on a Project row will also offer to delete the project. Tap YES to reach the confirmation dialog:
 | 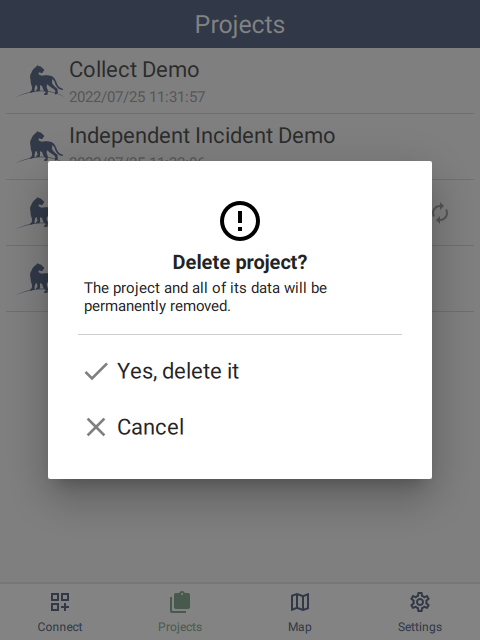 |
7.3. Map page
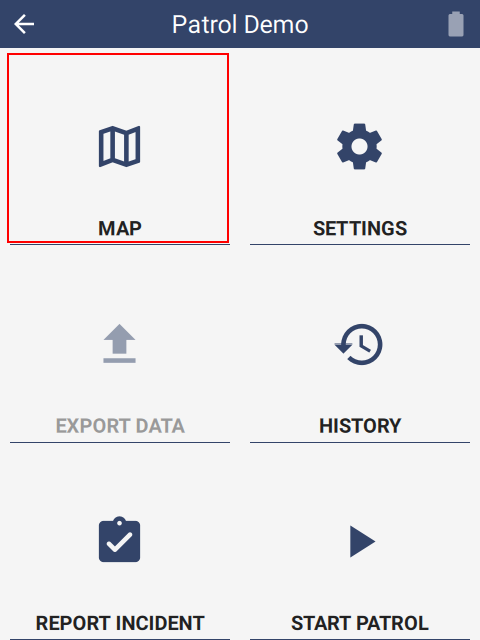
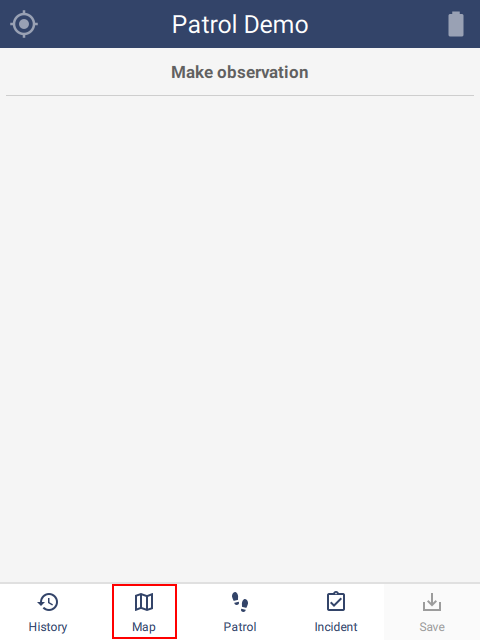
The Map page is available from several locations within SMART Mobile. There is a button on the home page, the project page and the Patrol/Survey observation page. The same page is displayed in each case, but when triggered from the Projects page (left-most), offline maps and observations from an individual project will not be available.
 |  |  |
7.3.1. Features
The Map page has the following features:
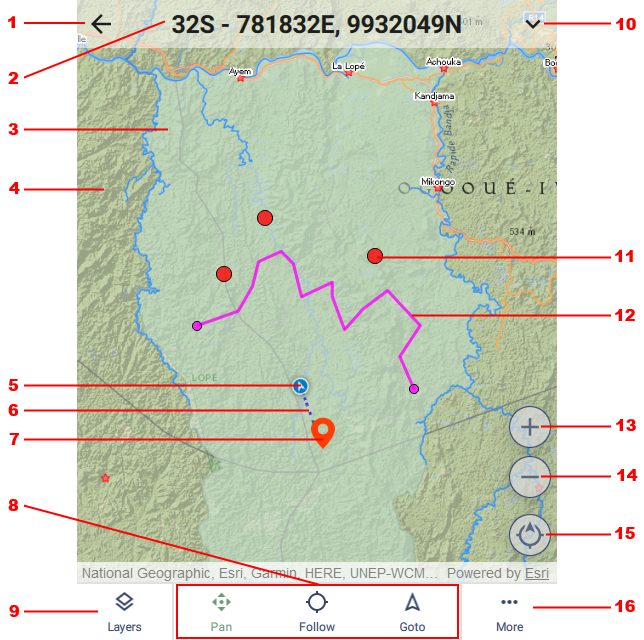 |
- Back to previous page
- Current location
- Offline map overlaid onto online map
- Online map (requires internet connection)
- Current location marker
- Track timer
- Observation - tap to select and see metadata
- Navigation mode: Pan requires the user to move the map, Follow and Goto move the map automatically as the location moves. Goto is designed for navigation.
- Open the Layers page
- Show or hide the additional information overlay. See More (16).
- Route point - tap to set Goto.
- Route line - tap ends to set Goto.
- Zoom in by 10%
- Zoom out by 10%
- Orientation - tap to reset to north at the top.
- Show or hide the additional information overlay. See (10).
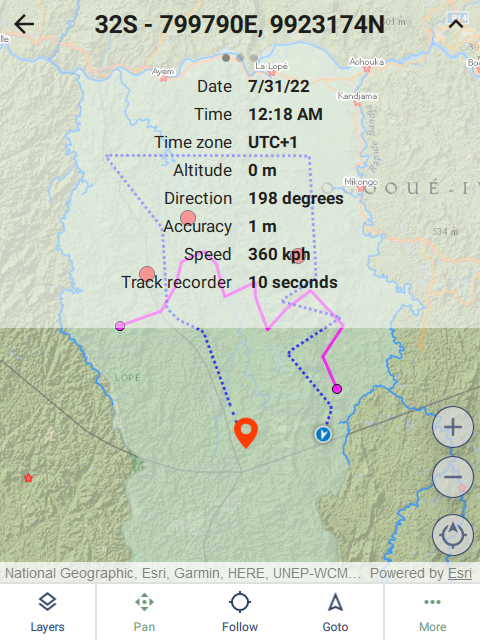
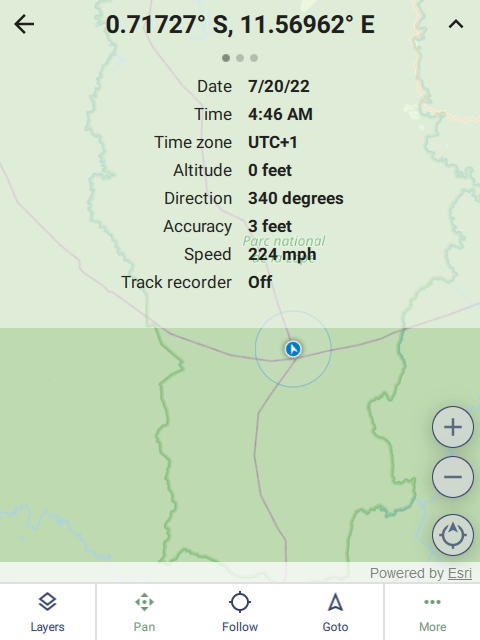
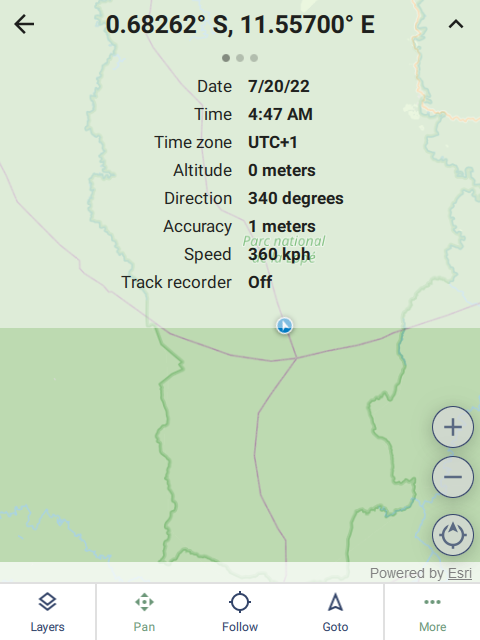
7.3.2. Data overlay
The Data overlay shows more detailed information about the state of the GPS. This includes the time, location, speed, heading and the state of the track recorder. This is purely informational.
 |
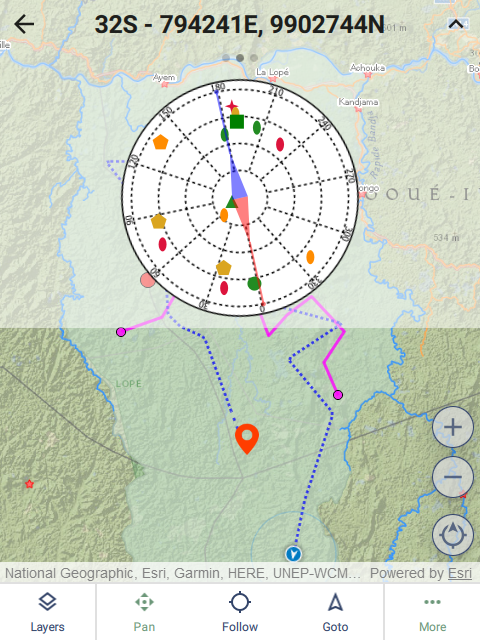
7.3.3. Compass overlay
The Compass overlay shows the compass and the location of the satellites that are being tracked by the GPS.
The compass needle is offset according to the magnetic declination.
The shapes on the dial represent satellites. The color represents the signal strength - green is strongest and red is weakest. Satellite views are not available on iOS.
The different types are: circle (Navstar), triangle (Glonass), pentagon (Galileo), star (Beidou), square (Qzss), diamond (Sbas), ellipse (other):
 |
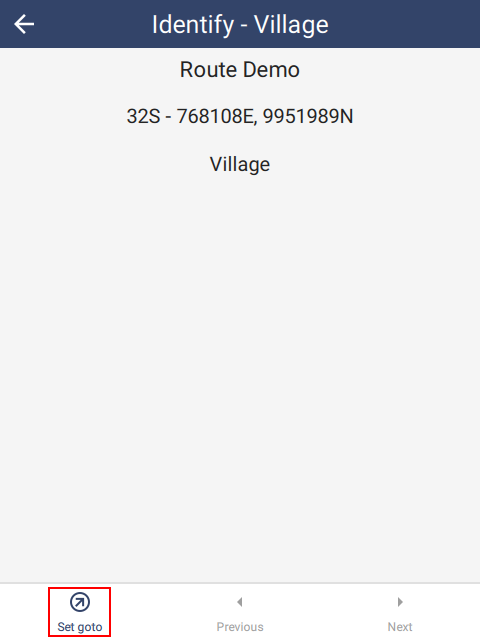
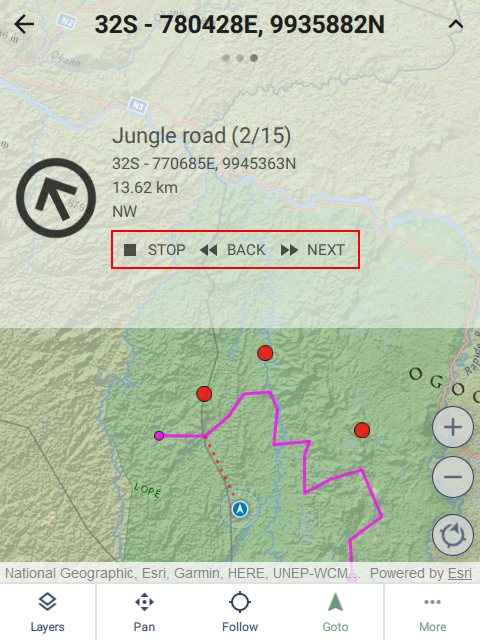
7.3.4. Goto overlay
The Goto overlay provides a simple directional navigation system. First tap the point - this will bring up the Identify page. Then tap Set goto. A red line appears connecting the current location with the destination. The overlay displaces the distance and direction from the current point.
 |  | 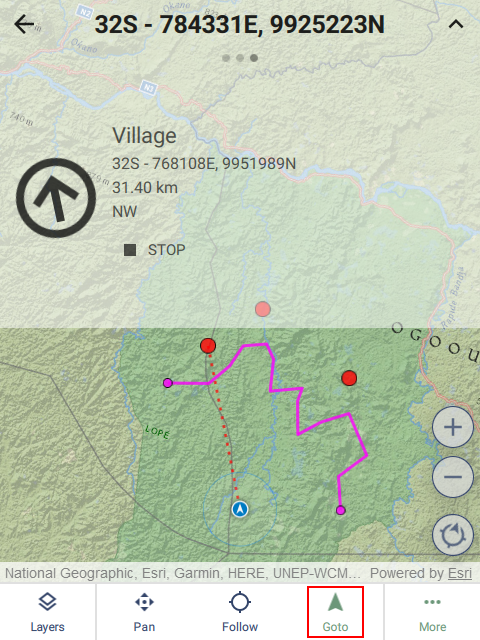 |
Tapping on the end points of a line route and tapping Set goto will configure the navigation system to target points along the line. Using Back and Next will move the target back and forward through the points on the line. If the device reaches one of the points, the system will automatically advance to the next point on the line. The direction of movement depends on which point was selected as the original target. Selecting the first point will move forward and selecting the last point will move backwards.
 |
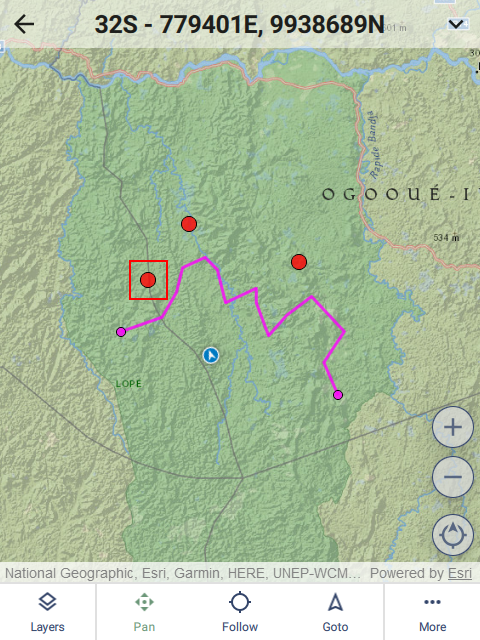
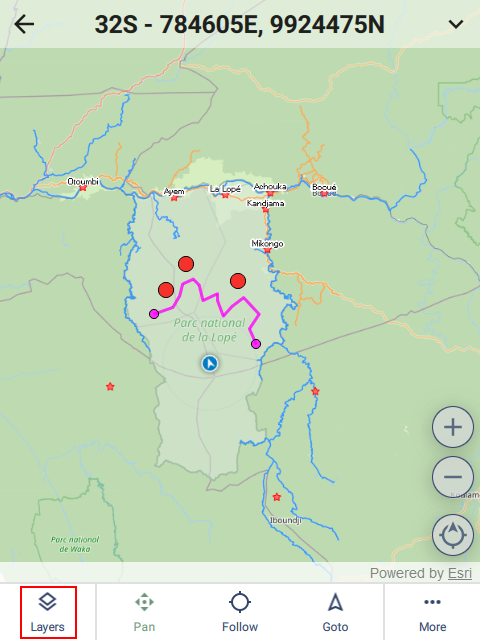
7.3.5. Layers
A map is composed of layers and they can be configured on the Layers page. The layers are ordered top to bottom with the topmost layer being the overlaid on all others.
 | 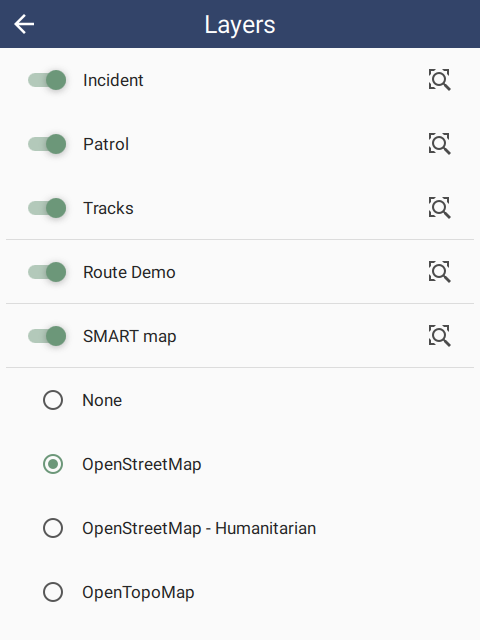 |  |
Incident and Patrol/Survey are the layers created by entering observations.
Tracks are the line captured automatically by the location track timer.
Route Demo is a route configured in the SMART Desktop (see section 6.4.). Routes can be deleted by swiping left on the route row and tapping YES to delete.
SMART map is an offline map configured in the Package settings (see section 6.3.5).
OpenStreetMap, etc are online layers which require an internet connection. None means that no online layer will be used. If no internet connection is available, the online map will not be used.
Layers can be shown or hidden by a switch on the left side of the layer row.
If a layer is enabled, a zoom to button is available on the right side of the layer row. This will zoom the entire layer into view, which is useful for navigation.
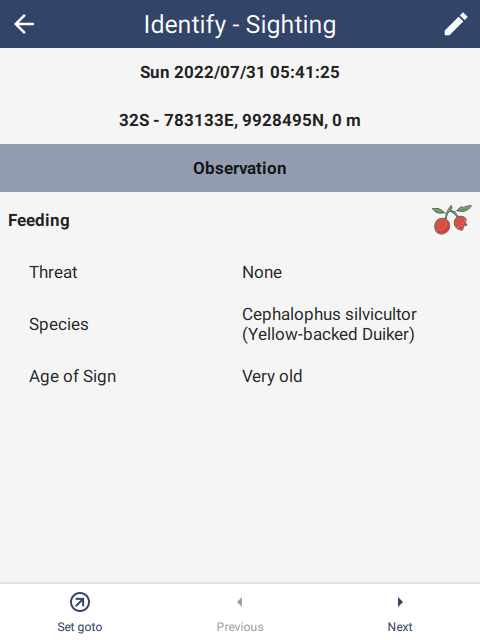
7.3.6. Identify
Tapping on a route point or observation will show the Identify page. Since tapping the screen may not be precise enough to select a single observation, all the points nearby the tap point are included and can be scrolled through one at a time using the Previous and Next buttons on the bottom toolbar.
If editing is allowed, the observation can be edited using the Edit button in the top right corner.
The location of the point can be used as a navigation target using the Set goto button in the bottom left corner.
 |
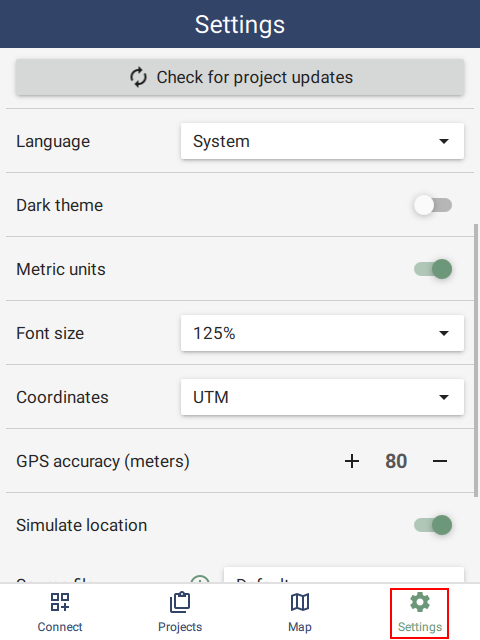
7.4. Settings tab
SMART Mobile has a Settings tab on the main page. These settings are for the whole application and cannot be configured by SMART Desktop:
 |
7.4.1. Check for Project updates
The Check for project updates option attempts to update all the projects at the same time. This is useful for keeping all projects up to date. Project that fail to update will not be updated and no error message will appear.
7.4.2. Language
Language governs the language of SMART Mobile, not the language of the data model. The data model language is specified in the package Settings, which is available only once the package has been launched.
SMART Mobile supports over 100 languages. New languages are routinely added and existing languages can be modified to improve correctness. Contact the SMART Forum to report an issue.
If the language is set to System, then SMART Mobile will use the current language setting from the device, i.e. if the device language is French, then SMART Mobile will automatically select French.
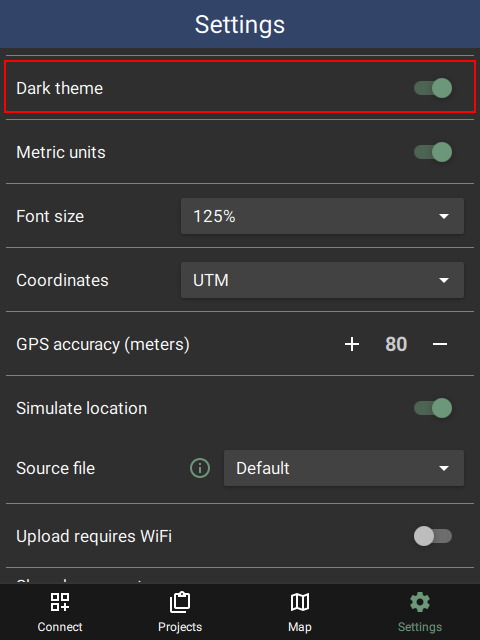
7.4.3. Dark theme
Light and dark themes are useful for improving the visibility of screen data. Dark theme is typically used for night viewing. It can also be toggled from the Project settings page and the Patrol/Survey popup:
 |
7.4.4. Metric units
Metric Units toggles between metric (meters, km/h) and imperial units (feet, mi/h). This is mostly used when viewing GPS data and Patrol leg data.
 |  |
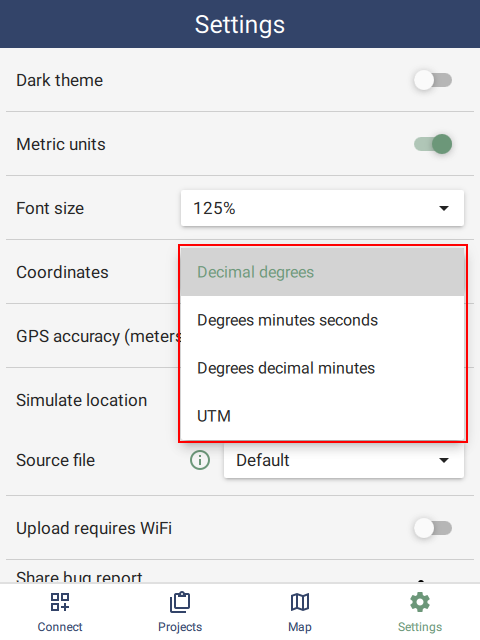
7.4.5. Font size
Font size governs the size multiplier for text in SMART Mobile. The options are 100%, 125% (default), 150%, 175% and 200%. All parts of the application are scaled accordingly. For example, this shows the setting at 175% across various screens:
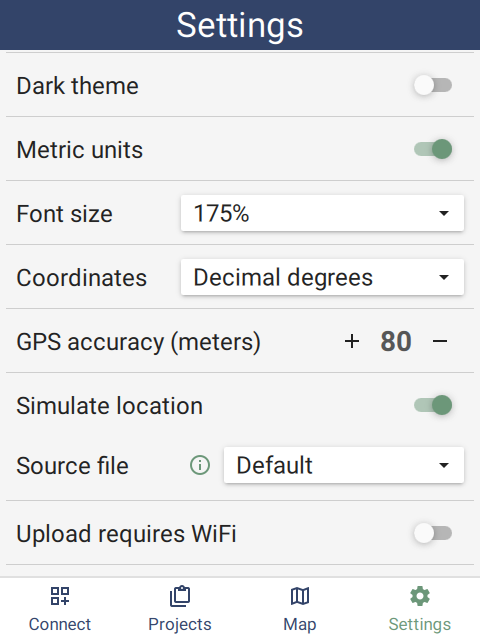 |  |  |
7.4.6. Coordinates
Coordinates specifies the format used for GPS coordinates throughout the application. The options are: Decimal degrees, Degrees minutes seconds, Degrees decimal minutes and UTM (Universal Transverse Mercator):
 |
7.4.7. GPS accuracy (meters)
The device GPS estimates the uncertainty in the reading provided. High values are usually caused by poor satellite geometry or obstructions. This setting provides a top level filter to help reduce the overall error in location readings.
7.4.8. Simulate location (desktop only)
The desktop version supports a GPS simulator. This simulator can read locations from an NMEA file. A new simulator path can be created using https://nmeagen.org. Once a path has been defined, download the resulting nmea file into the Downloads folder. The next time SMART Mobile starts up, it can be selected as the Source file for locations.
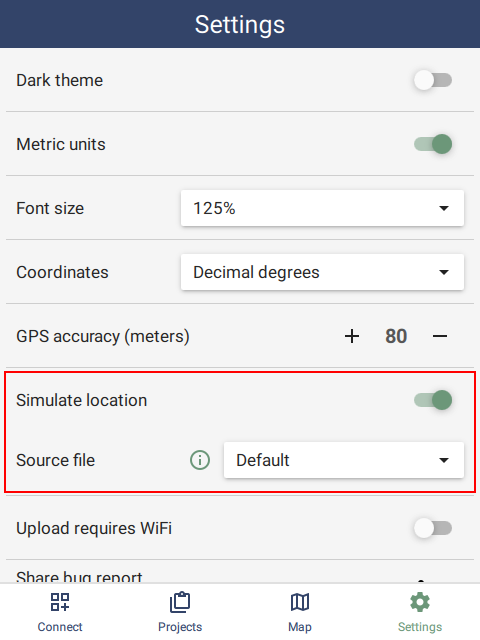 |
7.4.9. Upload requires WiFi (Android only)
Uploading data to a server will incur cellular data costs. If sending pictures, audio or long patrols, this could be a significant amount of data. This feature prevents data upload until the connection being used is WiFi.
7.4.10. Bug reports
See section 9.1 on creating bug reports.